
The Vortex effect appears as a swirling whirlpool in specified regions of the image. The Vortex can be made to move and grow by animating the various controls.
Vortex Node Inputs
There are two inputs on the Vortex node for the primary 2D image and the effect mask.
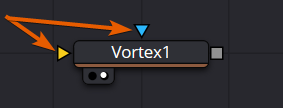
- Input: The orange image input is a required connection for the primary image you wish to swirl.
- Effect Mask: The optional blue effect mask input expects a mask shape created by polylines, basic primitive shapes, paint strokes, or bitmaps from other tools. Connecting a mask to this input limits the swirling vortex to only those pixels within the mask. An effects mask is applied to the tool after it is processed.
Vortex Node Controls Tab
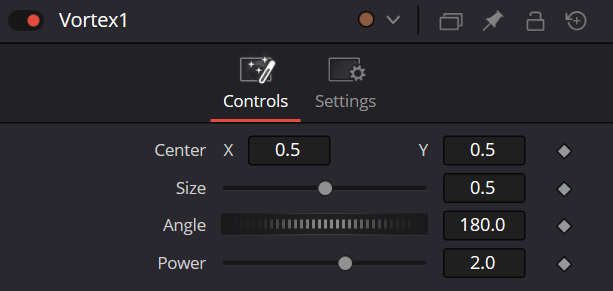
The Controls tab contains parameters for adjusting the position, size, and strength of the Vortex effect.
Center X and Y
This control is used to position the center of the Vortex effect on the image. The default is 0.5, 0.5, which positions the effect in the center of the image.
Size
Size changes the area affected by the Vortex. You can drag the circumference of the effect in the viewer or use the Size slider.
Angle
Drag the rotation handle in the viewer or use the thumbwheel control to change the amount of rotation in the Vortex. The higher the angle value, the greater the swirling effect.
Power
Increasing the Power slider makes the Vortex smaller but tighter. It effectively concentrates it inside the given image area.
Vortex Node Settings Tab
The Settings tab in the Inspector is also duplicated in other Warp nodes.

