The Z to World Pos node is used to either generate a World Position Pass from a Z channel and a 3D Camera or a Z channel from a World Position Pass and a 3D Camera.
Creating a World Position Pass from Z-depth can be useful when your 3D application is not capable of creating a WPP.
It can also be used when a 3D-tracking software outputs a per-pixel Z-depth together with the 3D Camera. Thus, the Volume Mask and Volume Fog could be applied to real-world scenes. The quality of the resulting WPP depends mainly on the quality of the incoming Z channel.
See the “WPP Concept” section for further explanation on how this technology works and to learn about the required imagery.
Z to World Pos Node Inputs
The following inputs appear on the node tile in the Node Editor:
- Image: The orange image input accepts an image containing a World Position Pass or a Z-depth pass, depending on the desired operation.
- Effect Mask: The blue input is for a mask shape created by polylines, basic primitive shapes, paint strokes, or bitmaps from other tools. Connecting a mask to this input limits the World Position Pass to certain areas.
- Scene Input: The magenta scene input accepts a 3D scene input containing a 3D Camera.
Z to World Pos Node Setup
Below, a MediaIn labeled RGBA contains the main rendered image from a 3D scene. A Z-depth pass from a 3D-rendered scene is labeled Z_PASS. The Channel Booleans node is used to map the Aux Z channel into either the red, green, or blue channel. The Z to World Position node is placed after the Channel Booleans node, and an imported 3D camera that matches the RGBA image is connected to the 3D camera input on the Z to World Position node. A Channel Booleans node is placed after the Z to World Position node, which can remap the X, Y, and Z positions for use in other nodes.
Z to World Pos Node Controls Tab
The Controls tab determines whether you are creating a World Position Pass or a Z channel. If there is more than one camera in the connected scene, this tab also selects the camera to use for the calculation.
Mode
This menu switches between creating a Z channel from a World Position Pass or vice versa.
Camera
If multiple cameras are available in the connected Scene input, this drop-down menu allows you to choose the correct camera needed to evaluate the image.
Z to World Pos Node Settings Tab
The Settings tab controls are common to all Position nodes. These common controls are described in detail HERE.
WPP Concept
The Position nodes in Fusion offer an entirely new way of working with masks and Volumetrics for footage containing XYZ Position channels. Z to World offers the option to create those channels out of a Z channel and 3D Camera information. For this overview, we refer to the World Position Pass as WPP.
What Is a WPP?
The WPP interprets each pixel’s XYZ position in 3D space as an RGB color value.
For instance, if a pixel sits at 0/0/0, the resulting pixel has an RGB value of 0/0/0 and thus will be black. If the pixel sits at 1/0/0 in the 3D scene, the resulting pixel is entirely red. Of course, if the coordinates of the pixel are something like -60/75/123, WPP interprets those values as RGB color values as well.
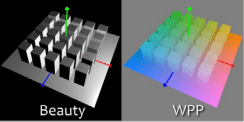
Due to the potentially enormous size of a 3D scene, the WPP channel should always be rendered in 32-bit floating point to provide the accuracy needed. The image below shows a 3D rendering of a scene with its center sitting at 0/0/0 in 3D Space and the related WPP. For better visibility, the WPP is normalized in this example.
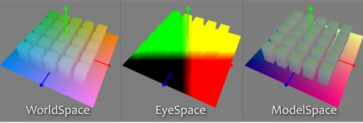
Different Coordinate Spaces
Rendering WPPs can occur in different Coordinate Spaces. These include World Space, Eye Space, and Object Space. The image below depicts how those different spaces look, although the nodes in Fusion require the WPP rendering to occur in World Space.
The Scene Input
The nodes offer a Scene input, which can either be a 3D camera or a 3D scene containing a camera. While the camera is vital for the Z to World node, Volume Mask and Volume Fog can generate their output without any camera attached or with the camera position set to 0/0/0.
However, connecting a camera that lines up with the original camera the WPP has been rendered from, or setting the camera’s position manually, dramatically improves the accuracy and look of the resulting fog or mask.
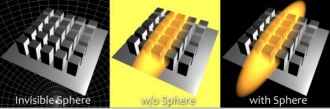
The “Invisible Sphere”
The example scene shown so far has an empty background, meaning there is nothing in the scene apart from the ground plane and the cubes.
If applying fog to a scene like that, which is larger than the ground plane, the result will look similar to the “w/o Sphere” example shown below because, with no WPP information outside the ground plane, the resulting value is 0/0/0, and the fog fills that area as well.
To get around that, you can add an invisible bounding sphere to your scene to create “dummy” WPP values to help the Fog node to create the correct volume as shown in the “with Sphere” example below.