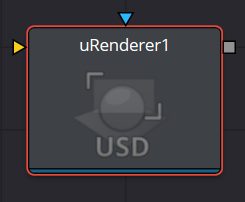
The uRenderer node converts the USD 3D scene into a 2D image, using either a default perspective camera or one of the cameras found in the scene. Every USD scene in a composition terminates with at least one uRenderer node.
uRenderer Inputs
The uRenderer node has two inputs. The main scene input takes in the uMerge or other USD nodes that need to be converted to 2D. The effect mask limits the uRenderer output.
SceneInput
The orange scene input is a required input that accepts a USD scene that you want to convert to 2D.
EffectMask
The blue effects mask input uses a 2D image to mask the output of the node.
uRenderer Node Setup
All USD scenes must end with a uRenderer node. The uRenderer node is used to convert a 3D scene into a 2D image. Below, the uRenderer node takes the output of a uMerge node and renders the 3D scene into a 2D image.
uRenderer Controls Tab
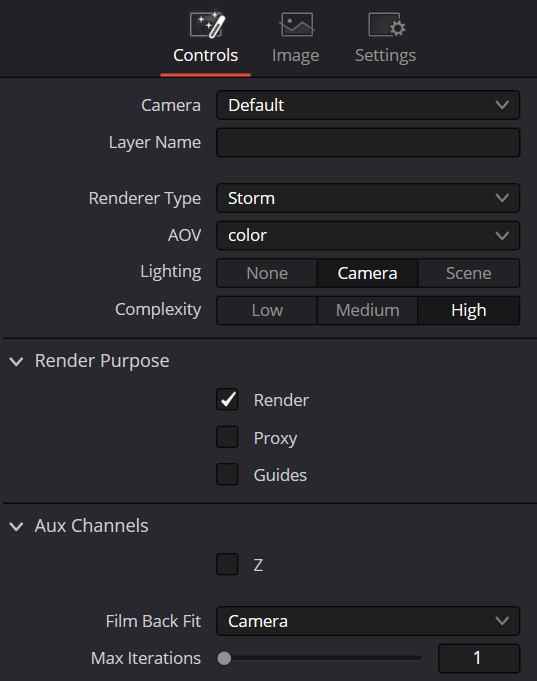
Camera
The Camera menu is used to select which camera from the scene is used when rendering. The Default setting uses the first camera found in the scene. If no camera is located, the default perspective view is used instead.
Renderer Type
This menu lists the available render engines. Storm is currently the only renderer available.
AOV
AOV or Arbitrary Output Variable, are additional passes that the render can output; these are also known as Deep Channels or Auxiliary channels. Color is one; others include Depth and Camera Depth.
Color
This outputs the main full-color render of the USD scene. This will include textures and lighting
Depth
This outputs a black-and-white depth map. This particular depth map is normalized for every frame, showing dynamic black to white values.
PrimID
This outputs a numeric value for each different prim in the USD scene.
Camera Depth
This outputs an accurate camera depth map, which calculates the camera’s position relative to the USD scene. The image is rendered as a float 32bit image; at first glance this will appear black.
Lighting
Controls how the USD scene is to be lit.
None
Disables all lighting.
Camera
Enabled objects are lit by the default camera light
Scene
Enabled objects are lit by any lights in the USD scene.
Enable Sky Dome
When checked, the sky dome texture is displayed and rendered from the uRenderer.
Complexity
This defines how much detail is rendered: Low, Medium, or High detail.
Aux Channel Z
This option enables rendering of the Z channel, the depth channel that represents the distance of each pixel from the camera. When enabled, the camera depth map is rendered to the Z channel.
Film Back Fit
Defines how the rendered image fits the camera’s Film Back. If the resolution of the images being rendered is not the same relative dimensions as the film back then these options set how to fit the image.
Max Iterations
This defines the amount of iterations of the rendering algorithm that will be processed.
uRenderer Image Tab
Process Mode: Lets you choose whether the output of the node will be processed as Full Frames or via one of the specified interlaced methods.
Image
Lets you control the output image size and aspect ratio.
Width/Height
Lets you set the pixel dimensions for the output of the node.
Pixel Aspect XY
Lets you set a custom pixel aspect ratio for non-square video formats.
Auto Resolution
Sets the resolution to the Timeline resolution. Uncheck to manually set the width/height above
Render Color Space
Allows you to render the output to Linear or sRGB color spaces.
Source Color Space
The Color Space Type menu sets the color space of the media to help achieve a linear workflow. Unlike the Gamut tool, this doesn‘t perform any actual color space conversion but rather adds the source space data into the metadata, if that metadata doesn‘t already exist. The metadata can then be used downstream by a Gamut tool with the From Image option, or in a Saver if explicit output spaces are defined there.
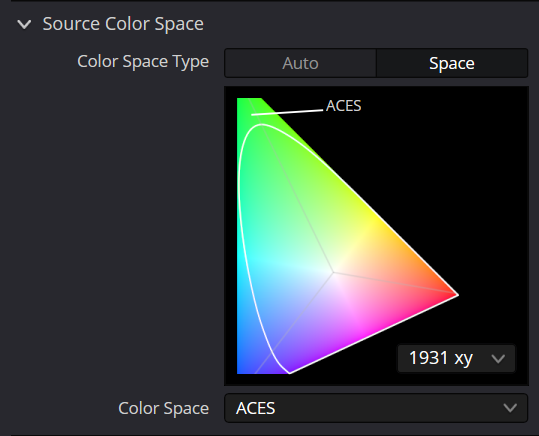
Auto
Passes along any metadata that might be in the incoming image
Space
Allows the user to set the color space from a variety of options.
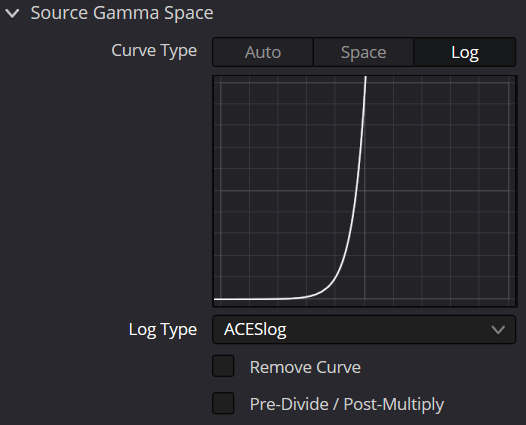
Source Gamma Space
The Curve Type menu automatically determines or allows you to choose the Gamma setting for the image and allows the option to remove the Gamma curve to help achieve a linear workflow.
Auto
Passes along any metadata that might be in the incoming image.
Space
Allows you to choose a specific setting from a Gamma Space drop-down menu, while a visual graph lets you see a representation of the gamma setting you’ve selected.
Log
Similar to the Log-Lin node, this option reveals specific log-encoded gamma profiles so that you can select the one that matches your content. A visual graph shows a representation of the log setting you’ve selected. When Cineon is selected from the Log Type menu, additional Lock RGB, Level, Soft Clip, Film Stock Gamma, Conversion Gamma, and Conversion table options are presented to finesse the gamma output.
Remove Curve
Depending on the selected gamma space or on the gamma space found in Auto mode, the associated gamma curve is removed from the material, effectively converting it to output in a linear color space.
Pre-Divide/Post-Mujltiply
Lets you convert “straight” Alpha channels into pre-multiplied Alpha channels, when necessary.
Common Controls
The Settings tab in the Inspector is also duplicated in other USD nodes

