One of the few things you may want to do before you add media to your project is to clone all camera original media onto a safe set of backup volumes, for redundancy in case any one volume fails. Additionally, you should consider cloning all media to an off-site backup as well.
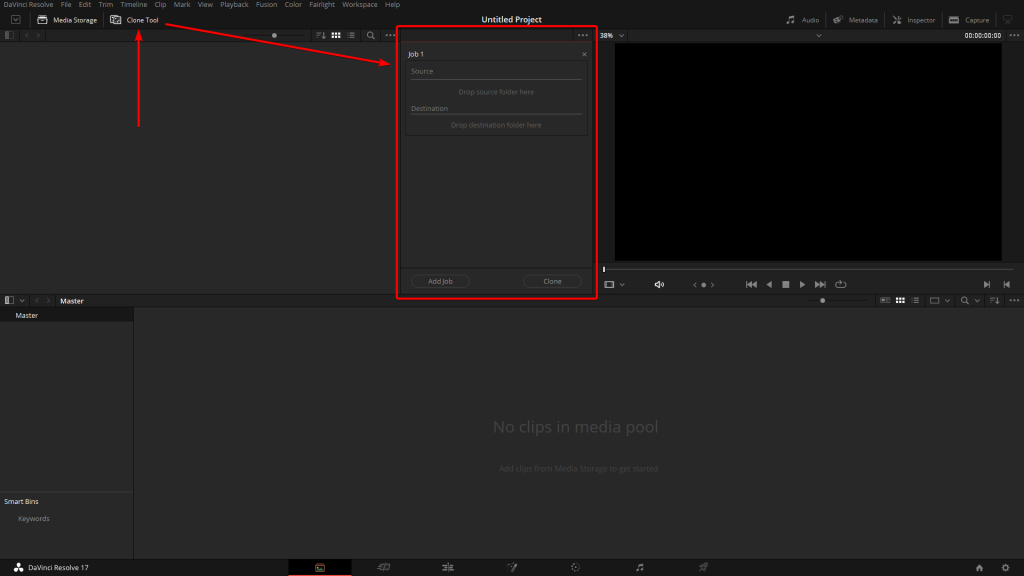
- Open the Clone Tool by clicking the Clone button at the far left of the Media Pool toolbar, which reveals the Clone Tool palette.
- Click the Add Job button at the bottom left to create a new job. A job item appears within the Clone Tool palette, with overlays to guide you through its use.
- Drag a volume or folder from the Media Storage panel to the “Drop source here” drop zone. Alternately, you can right-click any volume or folder in the Media Storage panel and choose Set As Clone Source.
- Next, drag one or more volumes or folders from the Media Storage panel to the “Drop destination here” drop zone. Alternately, you can right-click any volume or folder in the Media Storage panel and choose Set As Clone Destination. You can have more than one destination.
- If you want to preserve the top level folder name from the source volume or folder, click the Clone Tool panel’s option menu, and choose “Preserve Folder Name.” The overall folder structure of the cloned media is always preserved.
- If you want to change the checksum method used by DaVinci Resolve to verify that each clip has copied properly, you can choose an option from the Checksum submenu of the Clone Tool’s option menu. Each option is a tradeoff between the speed of your file copy operation and the security of the verification process. Greater security generally means a slower copy operation. The options are:
- None: Disables data verification, sacrificing safety for speed.
- File Size: Fast, but minimal data verification. Data verification is done simply by comparing the file size of a duplicate file with that of the original. “Collision resistance” refers to whether two files (or a file and an incorrectly duplicated file) may coincidentally have the same comparison value (be it file size, an error-detecting code, or a hash). File Size is very fast, but it’s minimally collision resistant.
- CRC 32: Faster than MD5, but less secure. An error-detecting code rather than the hash used by the next three options. A “check value” is generated based on the remainder of a polynomial division of the file’s contents. By comparing the check value derived from an original file with that derived from a copy, data integrity can be verified. This is a much faster data verification scheme than MD5 (the default), but it is significantly less collision resistant.
- MD5: This is the default setting. A reasonable tradeoff between speed and security. A hash function generates a 128-bit value that’s unique to a particular file; Data integrity is checked by comparing the hash value generated by the original file to that generated by the copied file. MD5 is not as collision resistant as the SHA options, but it’s a faster operation, and the probability of such collisions in conventional film and video workflows is probably small.
- SHA 256, SHA 512: Slower, but more secure. SHA is a more collision resistant hash function than MD5; options are provided for 256- and 512-bit value generation, with 512 being even more collision resistant than 256. However, these options are progressively slower than MD5, and will result in significantly slower copy times. Similarly to MD5, data integrity is checked by comparing the hash value generated by the original file to that generated by the copied file.
- When you’re ready, click the Clone button to initiate the cloning process.
To duplicate media quickly using the Clone Tool:
- Right-click any volume or folder in the Media Storage panel, and choose Set as Clone Source. A job item appears within the Clone Tool palette, populated by the volume or folder you selected.
- Next, right-click any volume or folder in the Media Storage panel, and choose Set As Clone Destination. You can do this more than once because you can have more than one destination.
- If you want to preserve the top level folder name from the source volume or folder, click the Clone Tool panel’s option menu, and choose “Preserve Folder Name.” The overall folder structure of the cloned media is always preserved.
- When you’re ready, click the Clone button to initiate the cloning process.


