3D Light Nodes
Lighting Nodes Common Controls
Nodes that handle 3D lighting share several identical controls in the Inspector. This section describes
controls that are common among 3D lighting nodes.
Transform Tab

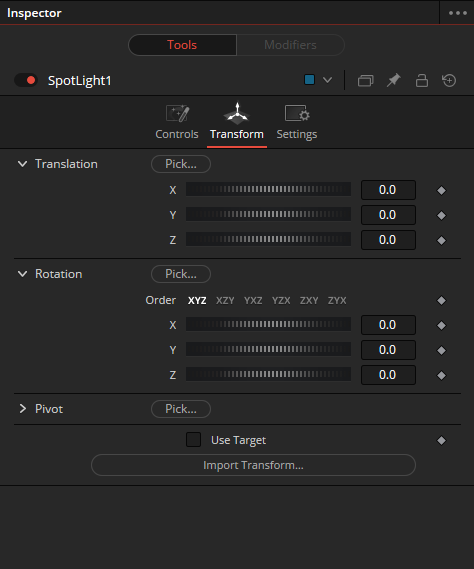
Many tools in the 3D category include a Transform tab used to position, rotate, and scale the object
in 3D space.
- Translation
- X, Y, Z Offset
These controls can be used to position the 3D element.
- X, Y, Z Offset
- Rotation
- Rotation Order
Use these buttons to select which order is used to apply Rotation along each axis of the object. For example, XYZ would apply the rotation to the X axis first, followed by the Y axis, and finally the Z axis. - X, Y, Z Rotation
Use these control to rotate the object around its pivot point. If the Use Target checkbox is selected, then the rotation is relative to the position of the target; otherwise, the global axis is used.
- Rotation Order
- Pivot
- X, Y, Z Pivot
A pivot point is the point around which an object rotates. Normally, an object rotates around its own center, which is considered to be a pivot of 0,0,0. These controls can be used to offset the pivot from the center.
- X, Y, Z Pivot
- Scale
- X, Y, Z Scale
If the Lock X/Y/Z checkbox is checked, a single Scale slider is shown. This adjusts the overall size of the object. If the Lock checkbox is unchecked, individual X, Y, and Z sliders are displayed to allow individual scaling in each dimension. Note: If the Lock checkbox is checked, scaling of individual dimensions is not possible, even when dragging specific axes of the Transformation Widget in scale mode.
- X, Y, Z Scale
- Use Target
Selecting the Use Target checkbox enables a set of controls for positioning an XYZ target. When Target is enabled, the object always rotates to face the target. The rotation of the object becomes relative to the target. - Import Transform
The Import Transform button imports only transformation data. For 3D geometry, lights, and cameras, consider using the File > FBX Import option. Transform button opens a file browser where you can select a scene file saved or exported by your 3D application. It supports the following file types:
| LightWave Scene | .lws |
| Max Scene | .ase |
| Maya Ascii Scene | .ma |
| dotXSI | .xsi |
3D Light Nodes Onscreen Transformation Controls

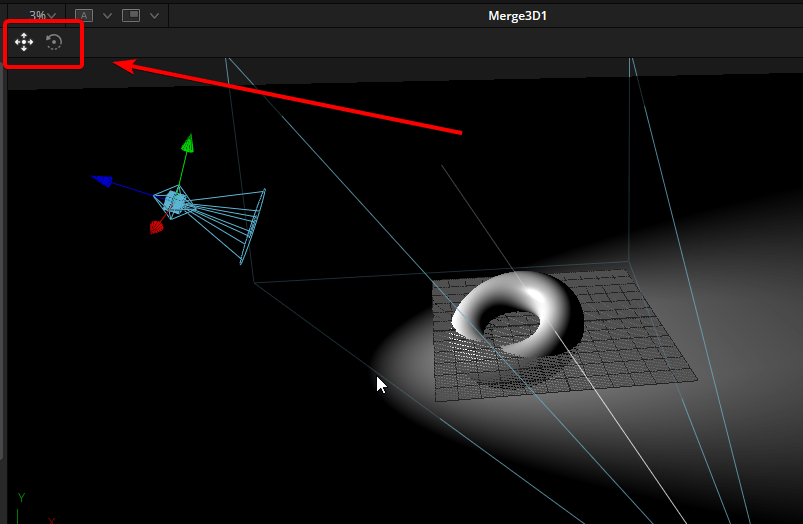
Viewer Transform buttons
Most of the controls in the Transform tab are represented in the viewer with onscreen controls for transformation, rotation, and scaling. To change the mode of the onscreen controls, select one of the three buttons in the toolbar in the upper left of the viewer. The modes can also be toggled using the keyboard shortcut Q for translation, W for rotation, and E for scaling. In all three modes, individual axes of the control may be dragged to affect just that axis, or the center of the control may be dragged to affect all three axes.
The Scale sliders for most 3D tools default to locked, which causes uniform scaling of all three axes. Unlock the Lock X/Y/Z Scale checkbox to scale an object on a single axis only.
3D Light Nodes Settings Tab
The Common Settings tab can be found on almost every tool found in Fusion. The following controls are specific settings for 3D nodes.
- Hide Incoming Connections
Enabling this checkbox can hide connection lines from incoming nodes, making a node tree appear cleaner and easier to read. When enabled, fields for each input on a node are displayed. Dragging a connected node from the node tree into the field hides that incoming connection line as long as the node is not selected in the node tree. When the node is selected in the node tree, the line reappears. - Comment Tab
The Comment tab contains a single text control that is used to add comments and notes to the tool. When a note is added to a tool, a small red dot icon appears next to the setting’s tab icon, and a text bubble appears on the node. To see the note in the Node Editor, hold the mouse pointer over the node for a moment. The contents of the Comments tab can be animated over time, if required. - Scripting Tab
The Scripting tab is present on every tool in Fusion. It contains several edit boxes used to add scripts that process when the tool is rendering. For more details on the contents of this tab, please consult the scripting documentation.


