Understanding and Using Busses in DaVinci Resolve Fairlight
Audio mixing in DaVinci Resolve’s Fairlight page offers powerful tools to sculpt your sound. A fundamental concept for efficient and organized mixing is the use of busses. This guide breaks down what busses are, why they are crucial, and how to use them effectively.
What is an Audio Bus?
At its core, a bus in Fairlight is a common signal connection point. It takes the output from multiple audio sources – such as tracks or even other busses – and mixes them together into a single signal. You can think of it simply as a “group channel.”
Busses are flexible and can accommodate various audio formats, from mono and stereo up to complex surround sound like 5.1 or immersive formats like Dolby Atmos 9.1.6.
The primary benefit of using a bus is control. A single bus channel strip gives you mastery over the combined level, processing, and effects applied to all the signals routed through it.
Why Use Busses in Your Mix?
Working on projects with many audio tracks quickly highlights the need for organization. Busses provide a powerful way to streamline your workflow:
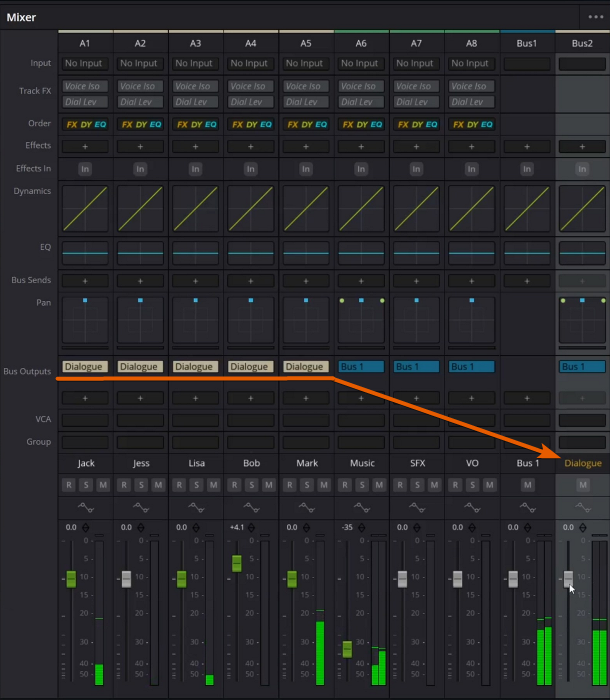
- Organization: Group similar sounds together. For example, route all your individual dialogue tracks to a single “Dialogue Submix” bus.
- Centralized Control: Once grouped, you can control the overall level of that group (like all dialogue) with a single fader on the bus channel strip.
- Efficient Processing: Apply effects (like EQ or compression) to the entire group at once on the bus, ensuring consistency across those tracks.
- Complex Mix Building: Route submix busses (like Dialogue, Music, and Effects) into main busses to create your final program mix. This structured approach makes managing large projects much easier.
- Flexible Deliverables: Create different versions of your mix by routing submixes to different main output busses (e.g., a standard stereo mix and a separate surround mix).
Getting Started: Creating Busses
Setting up busses is straightforward:
- Go to the Fairlight menu at the top of the screen.
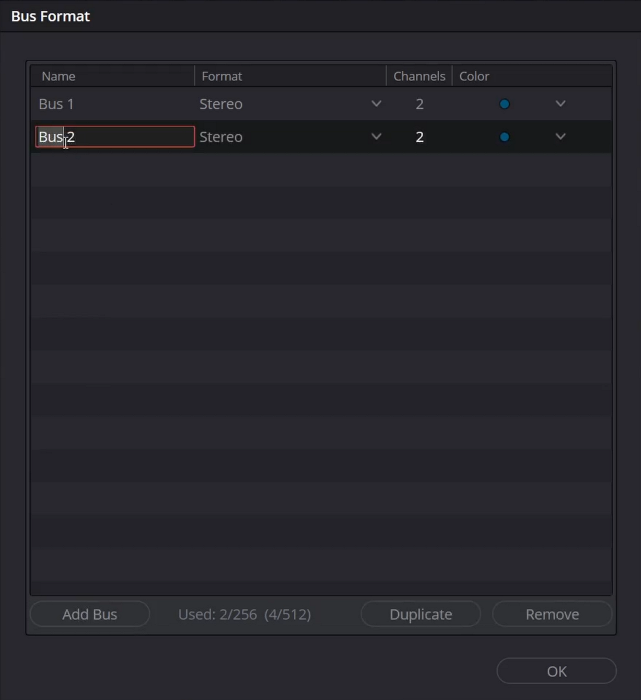
- Select Bus Format. This opens the Bus Format window.
- In the list section, click the Add Bus button. A new bus appears in the list.
- Click on the default name of the new bus to rename it (e.g., “Dialogue Submix”).
- Use the Format dropdown menu for that bus entry to choose the required format (e.g., Stereo, 5.1).
- Optionally, use the Color dropdown to assign a color to the bus channel strip for easy identification.
- Click OK to confirm your changes and close the window. The new bus is now available in your project.
Assigning Tracks and Busses
Once busses are created, you need to route your audio signals to them:
Assigning a Single Track (Mixer):
- Open the Mixer (Fairlight menu > Mixer).
- Locate the channel strip for the track you want to assign.
- Find the Bus Output section (or Bus Sends).
- Click the plus (+) icon.
- A dropdown list of your available busses appears. Select the desired destination bus.
- The track’s output is now routed to that bus.
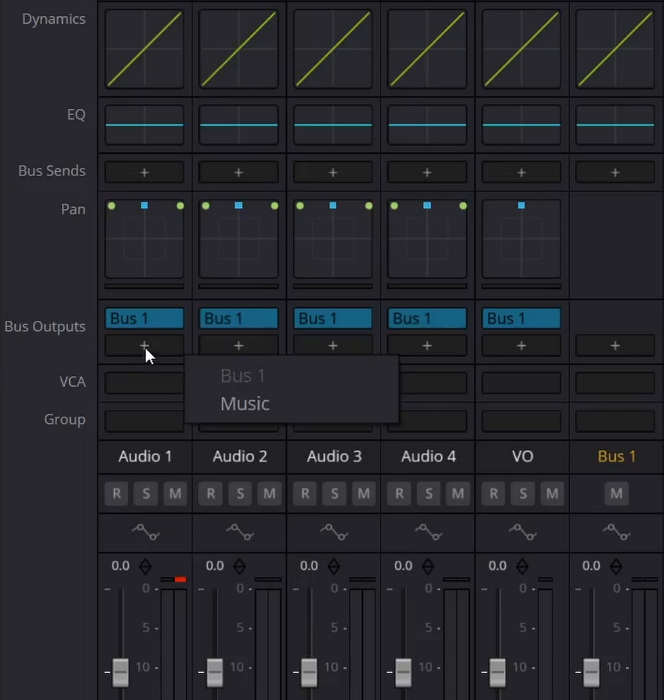
Assigning Multiple Tracks (Mixer Shortcut):
This method is much faster for grouping many tracks at once:
- In the Mixer or Timeline, select all the tracks you want to route to the same bus.
- Hold down the Alt key (Windows) or Option key (Mac).
- Click the plus (+) icon on any of the selected track channel strips in the Bus Output section.
- Select the desired destination bus from the dropdown.
- All selected tracks will now be assigned to that bus.
Assigning Multiple Tracks/Busses (Bus Assign Window):
For managing complex assignments or routing busses to other busses, the Bus Assign window is powerful:
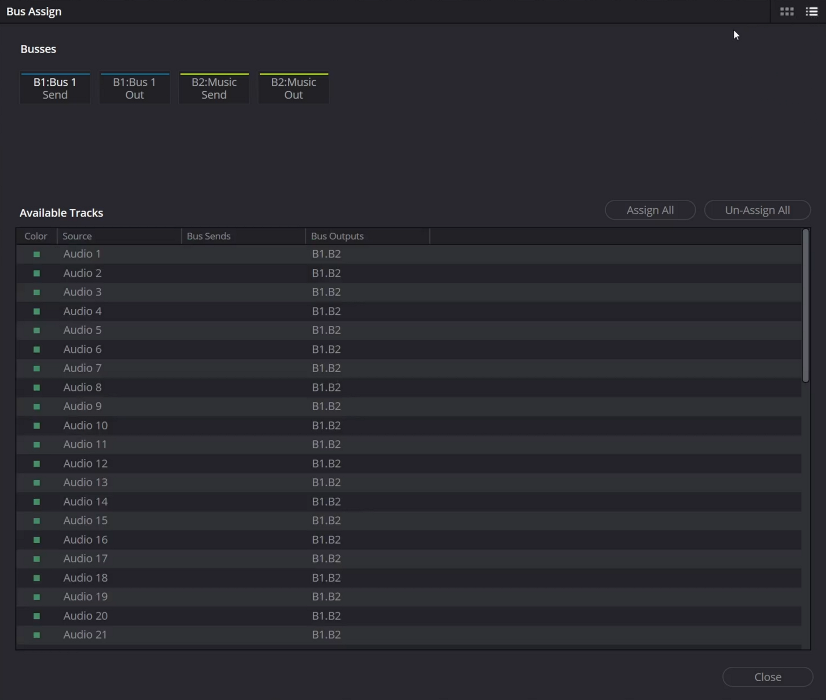
- Go to the Fairlight menu.
- Select Bus Assign. This opens the Bus Assign window.
- The window shows available busses at the top (Send and Out options) and a list of tracks and busses at the bottom.
- Select a bus from the top section (click on its Send or Out button).
- In the bottom list, click on the tracks or busses you want to route the selected bus to. You can also click and drag to select multiple destinations.
- Use the Assign All or Unassign All buttons for quick management of that selected bus’s destinations.
- Click Close when you are finished.
Signal Routing and Patching
Patching is the process of routing signals from external sources (like microphones) to tracks for recording, or from busses/tracks to physical audio outputs (like speakers) for playback.
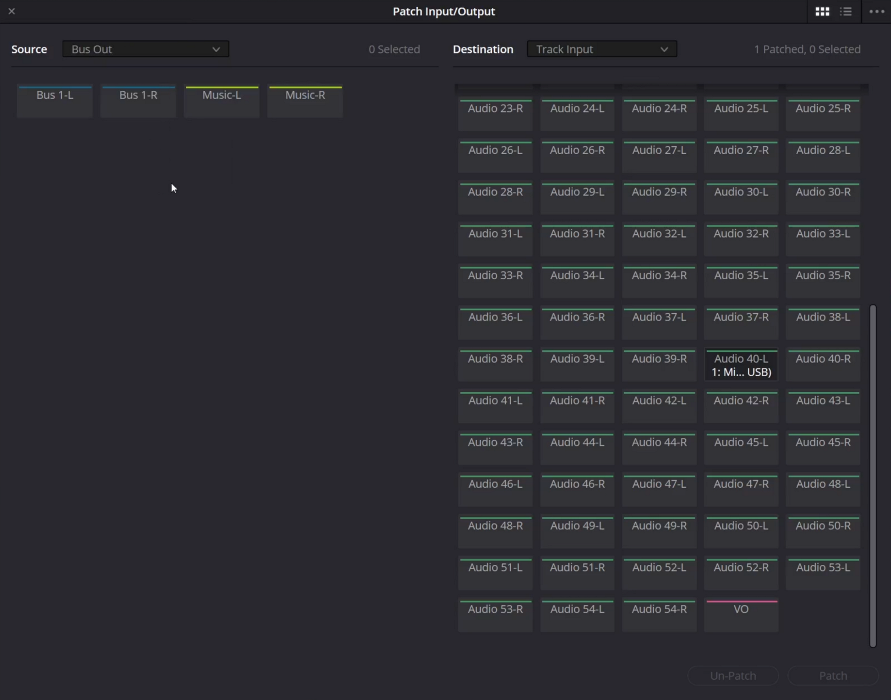
- Go to the Fairlight menu.
- Select Patch Input/Output.
The Patch Input/Output window is split into two sides: Source (signals coming from) and Destination (signals going to).
Common Patching Examples:
- Recording: By default, the window often shows Audio Inputs (your physical hardware inputs) as the Source and Track Inputs (the inputs to your timeline tracks) as the Destination. To patch a microphone connected to Input 1 to Track 1, select “Audio 1 Input” on the left, “Track 1 Input” on the right, and click the Patch button.
- Playback: To hear your final mix, select the Bus Out category from the Source dropdown (usually your Main bus), select the Audio Outputs category from the Destination dropdown (your speakers/headphones), and patch your main bus output to your desired physical outputs.
Quick Patching from Channel Strips:
Each channel strip has an Input dropdown menu at the top. This provides shortcuts to open the Patch Input/Output window with common configurations:
- Input: Opens the window set up for patching audio inputs to track inputs – ideal for preparing to record.
- Bus: Opens the window set up for patching busses (Bus Out or Bus Sends) to track channels.
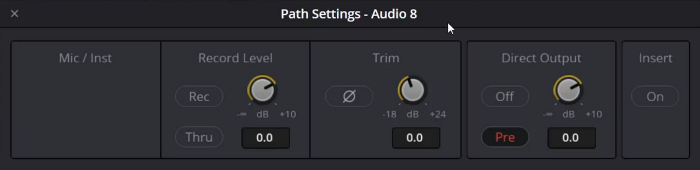
- Path Settings: Opens a separate window for adjusting settings like input level, polarity (phase inversion), and playback trim level for that specific track.
Fairlight’s Bussing System: FlexBus vs. Legacy
Fairlight uses a highly flexible system called FlexBus. This is the modern default and recommended approach for new projects.
There is an older system called Legacy Fixed Bussing, primarily kept for backwards compatibility with older projects. There is generally no advantage to using the legacy method for new work, as FlexBus offers greater capabilities and supports newer features.
You can check or change the bussing system for a project in the Project Settings:
- Click the gear icon in the bottom right corner.
- Go to the Fairlight panel.
- Under the Bussing heading, check or uncheck “Use fixed bus mapping.” Note: Converting from Legacy to FlexBus is a one-way operation.
Advantages of FlexBus:
- Complete Flexibility: User-definable routing allows track-to-bus, bus-to-bus, and bus-to-track connections.
- Multiple Destinations: Direct a single signal source to many different places simultaneously.
- Complex Output Scenarios: Route a final mix to one bus, then split that bus into multiple outputs with different processing (e.g., creating mixes with different loudness standards at the same time).
- Surround & Immersive Support: Route tracks via surround panners to busses configured for specific formats (5.1, Atmos, etc.) and output different formats simultaneously.
- Deep Layering: Busses can send signals to other busses up to six layers deep, enabling intricate stem building.
- Automation Control: Busses can be exposed as tracks in the timeline to view and edit automation applied to bus parameters.
Conclusion
Bussing is a fundamental technique for professional audio mixing in DaVinci Resolve’s Fairlight page. By understanding how to create, assign, and patch signals through busses, you gain incredible control over your audio, streamline your workflow, and can build highly complex and organized mixes. Utilizing the power of the FlexBus system provides the flexibility needed for any project scenario.


Start the discussion at postprolist.com